Pagination is a common technique used for the design of websites that offer a large amount of content to their users. For example, e-commerce websites commonly use pagination in order to display their products in a more organized manner.
However, what you may not know is that some popular Content Management Systems (CMS) incorrectly treat paginated pages as duplicate content. They canonicalize all paginated pages to the first one in the set.
Google lists this as the most common canonical mistake they see in the wild.
Improper canonicalization of paginated pages could result in the loss of the opportunity to include vital internal links, keywords such as product names, and other important content in the search engine’s index and algorithms.
This issue can apply to websites containing news, merchandise, or other large amounts of content. Using the RankSense app, with help from the Screaming Frog SEO Spider crawler, you can correct these mistakes on your website. More importantly, you can also track the effectiveness of the solution.
 Table of Contents:
Complications arising from improper implementation of canonicals
Some CMSs canonicalize paginated pages to the first page since many of these CMSs are not geared towards SEO.
You may be wondering, “What’s so bad about a canonical tag pointing to the first page?”
When Googlebot crawls the website and its paginated pages, it looks for certain factors in order to determine whether or not a page should be indexed. This includes the site’s canonical tags, sitemaps, and most importantly, its internal links.
When all of the paginated pages include a canonical tag that points to the first page in the set, Google will treat the content on these pages as duplicate and will eventually drop all of their content, including their internal links, from the index. This is especially problematic when there are no other internal links on the site pointing to the products on these paginated pages. This makes it extremely hard for those product pages to be indexed, much less show up in Google’s search results.
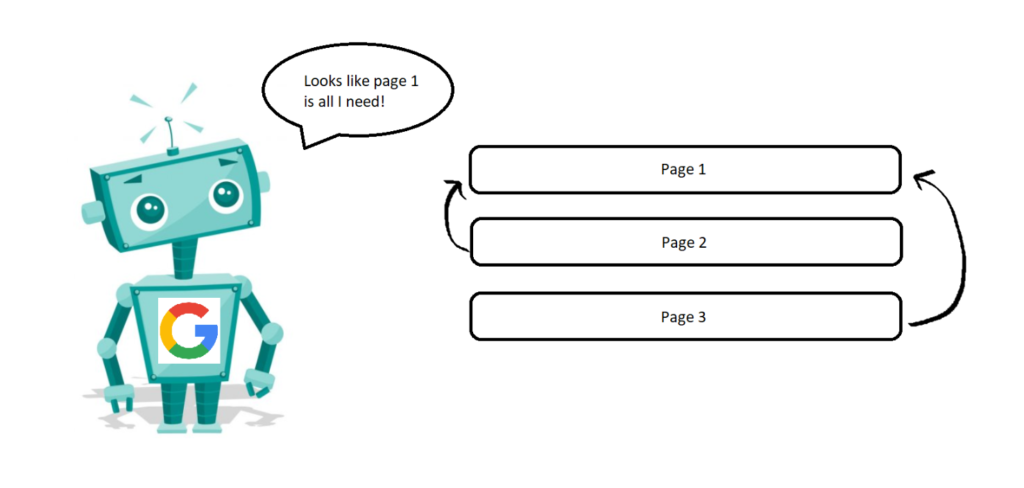
For example, suppose there is an e-commerce company named “Cool Clothes” which sells all types of clothing and accessories with many categories. The company uses pagination in order to divide its large inventory into multiple pages. Now suppose a potential customer searches for a specific shoe on Google. Though “Cool Clothes” has that exact shoe in stock on their website, the shoe is located on page 3 instead of page 1. Therefore, this shoe will most likely not show up in the search results as only the products and keywords on page 1 have a high chance of being indexed and ranked. (Assuming that this specific shoe is not linked to anywhere else on the site but the paginated page.)
Solving the problem with self-referential canonical tags
An effective solution to this problem is the implementation of self-referential canonical tags on all of the paginated pages on the site. Self-referential canonical tags are canonicals that point to themselves. In theory, self-referential canonical tags would be better to use as the other pages in the paginated set can contain valuable internal links, keywords, and content which would make a difference when they are properly indexed and processed.
However in specific use cases, including a category containing an extremely large amount of paginated pages, it may be preferable for the first page to be the only one that is indexed. In this case, self-referential canonicals are not beneficial. Therefore, the RankSense app is extremely useful since it can track the performance of your changes and learn whether or not the changes you made were optimal.
Implementing self-referential canonicals using Screaming Frog and RankSense
Let’s look at how to implement and track these canonical tags using the RankSense Cloudflare app along with the Screaming Frog SEO Spider crawler.
It is difficult to find every canonical tag that must be fixed by manually reviewing the website’s code, as this can be a very lengthy and tedious process. An easy way to find which URLs need to be fixed is by crawling the website using an SEO crawler of your choice. In this article we will be using the Screaming Frog SEO Spider.
(Note: If you already have the list of URLs which you would like to fix, you can skip to the RankSense implementation in step 6).
Step 1: Installation
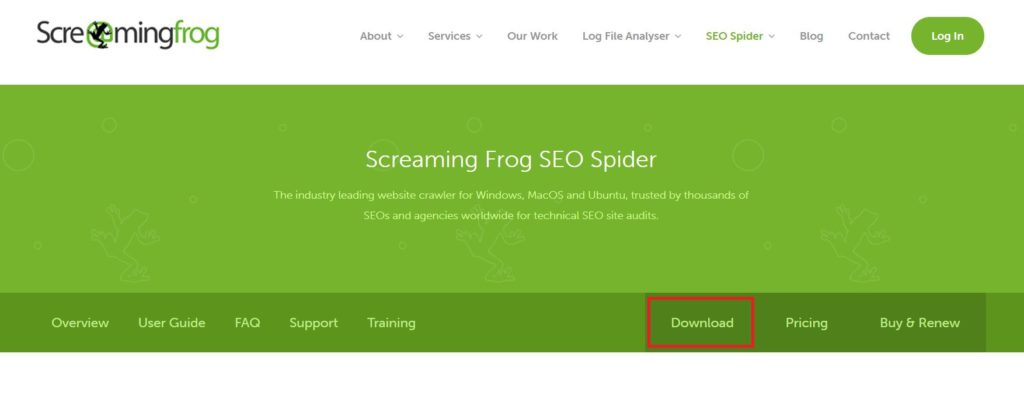
The first step is to install the Screaming Frog SEO Spider crawler if you have not installed it already. You can find the download here.
 Step 2: Crawling the Website
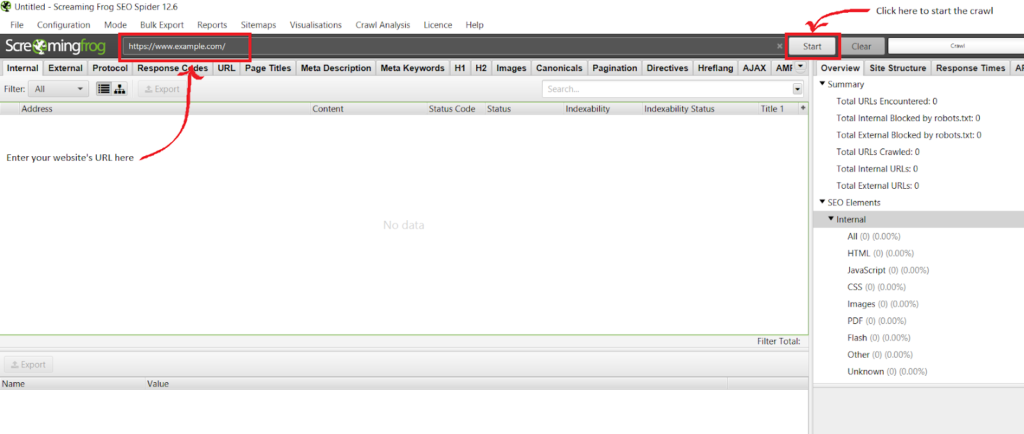
Once you have installed the crawler, open up the application and locate the text box at the top of the application right next to the logo. Here you will input your website URL in order to allow screaming frog to crawl your entire site. Once you have pasted the URL, click “Start” in order to begin the crawl.
(Note: This may take a while depending on the size of your website).
 Step 3: Finding the Site’s Canonical Tags
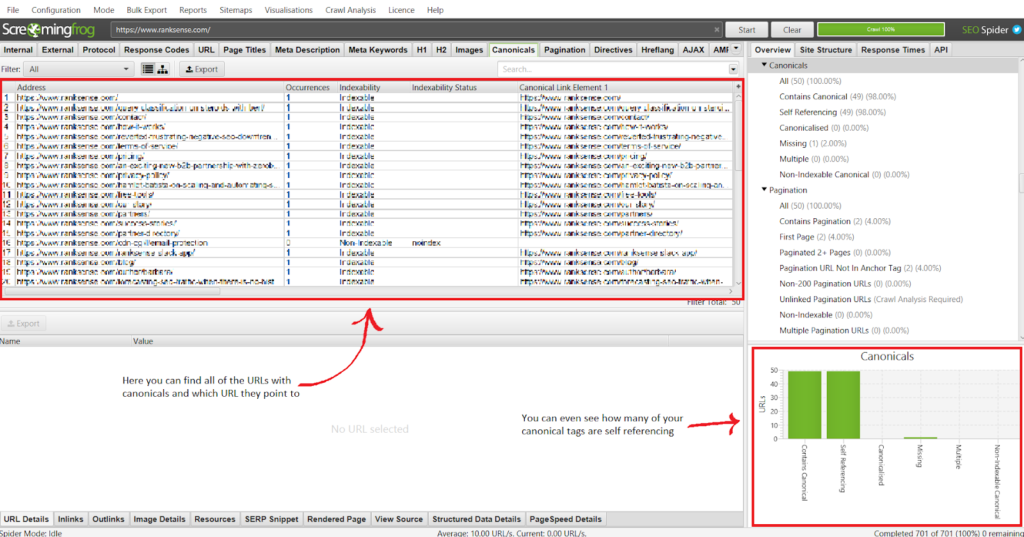
After the crawl has finished, you will notice that the crawler displays a large amount of information about your website. There are multiple tabs that organize the information in a user-friendly manner. In this particular scenario, we will be focusing on the “Canonicals” tab. If the Canonicals tab does not appear on your screen, click the downwards triangle at the end of the list of tabs in order to view the rest of the subsections.

Step 4: Interpreting the Canonicals tab
Once you click on the “Canonicals” tab, you will see a list of URLs containing canonical tags under the “Address” column. The “Canonical Link Element” column shows which URL those canonicals are pointing to. In the bottom right corner of the screen, there is a bar graph that shows you how many total canonicals you have on your website and how many of these are self-referencing.
Step 5: Finding the Canonicals Requiring Changes
Using this list of URLs, you can go through and find the URLs of the paginated pages and double-check where their canonicals are pointing to. If you see that all of the paginated pages under a certain category have canonicals pointing to the first page in the set, you can simply copy and paste them into a spreadsheet in order to quickly implement these changes using the RankSense app. As you can see, using the Screaming Frog SEO Spider can drastically cut down the time needed to implement these changes.
(Note: If this is your first time using the crawler, feel free to explore it.)
Step 6: Implementing the Changes Using RankSense
Once you have the list of URLs that need to be fixed, implementing these canonical tags using the RankSense app is a very straightforward and quick process. If you do not have RankSense installed, you can do so by following the steps in this article. If you are not familiar with creating custom SEO “rules” using the RankSense app, I recommend that you read this article first.
Using the “Canonical Tags” RankSense rules sheet, there is a column for the URL and the canonical URL. Instead of having to manually apply a self-referential canonical tag to every page for every product category, we can use a “magic URL value” to apply these rules with great efficiency.
First, identify the URL parameter which your website uses to identify different pages. (ex: https://www.example.com/test?page=2 or https://www.example.com/test?p=2)
Next, in the “URL” column on the “Canonical Tags” rules sheet, enter the URL of a product page, but enter an asterisk at the end of the URL parameter. (ex: https://www.example.com/heaters?page=*). This asterisk serves as a “wildcard” and in this case, the rule will be applied to every page showing heaters, no matter how many there are.
Under the “canonical” column on the rules sheet, you will enter the URL of the product page but it is important to add {keep_params=page} as the URL parameter. (ex: https://www.example.com/heaters?{keep_params=page}). This will keep the page parameter as the value and every page showing heaters will have a self-referential canonical tag implemented.
Next, simply import the rule sheet into the RankSense app and publish it to staging first, followed by publishing the rules into production. You can verify whether the changes were published successfully by reviewing the canonical tags directly on the website’s HTML, using the RankSense chrome extension using this guide, or re-crawling the pages with your crawler of choice. Rules published to staging can only be checked with the RankSense chrome extension.
(Note: When importing the rules sheet, you will see an option to add tags. This is important for later).

How to tag and track your changes using the RankSense Insights tab
At this point, you may be thinking, “Why shouldn’t I just implement these changes myself directly on my CMS?”
One of the key features of the RankSense app is the ability to tag and track the performance of your changes. With this information, you can determine whether your changes were beneficial or detrimental. Instead of having to wait for months on end, you can track the progress of your specific changes on a weekly basis if you would like. This allows for a more “agile” approach to SEO and gives you the ability to track the performance of these new canonical tags and determine whether they were beneficial to your website or not. Instead of making changes to all of the pages on your site, you can “test” these changes on a small portion of your site, see how effective they were, and then roll out these changes to more pages on the site if they were a success.
Step 1: Tagging your Rules Sheet
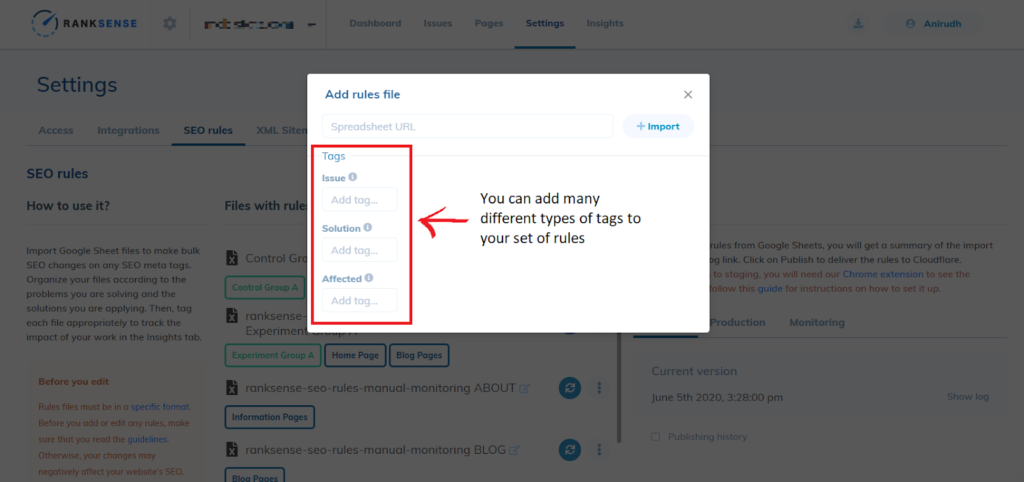
When importing your rules sheet into the RankSense app in order to publish the rules, you will be given the option of adding tags to that set of rules. (You can import and publish rule sheets on the app by navigating to Settings -> SEO rules). These tags can either represent an issue that the pages are facing, a solution that has been implemented to solve the problem, or the types of pages which have been affected. In this case, the tags to use would include the “Paginated pages not indexed” tag under the “Issue” category, the “Add Correct Canonicals” tag under the “Solution” category, and the “Category pages” tag under the “Affected” category.
Step 2: Creating a Custom Report
Now that you have tagged and published your changes, you can track their performance by clicking on the “Insights” tab. Here you can create a custom report that includes the number of search clicks that each of the pages has generated. You can either track the pages by viewing the results of all of the rules tagged under the specific tags you selected, or by selecting the rule sheet that was just published. You can even select which search engine you would like to view the statistics for and pick a specific time frame in order to study their performance.
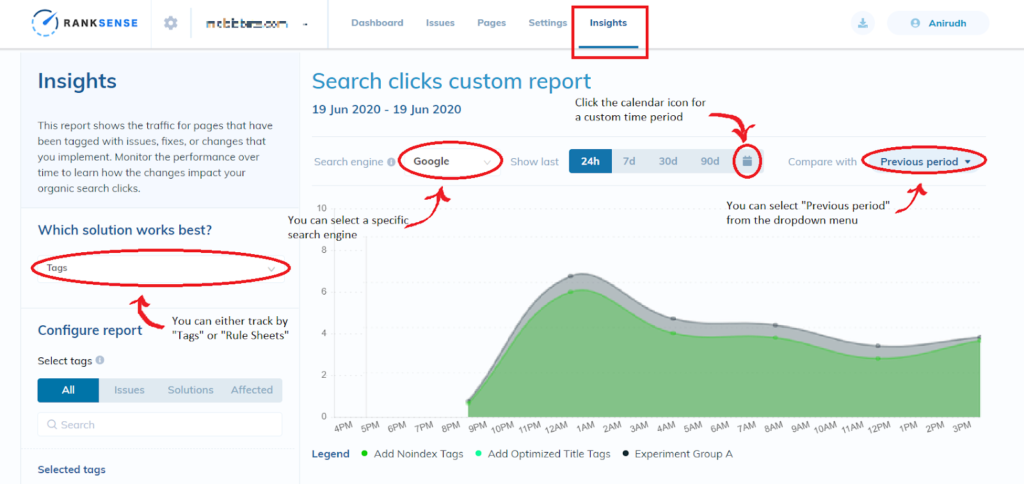
Next to “Compare with”, you can click on the “Previous period” button in order to compare the performance of these pages before the canonical tags were changed versus their performance after the implementation of the self-referential canonicals. This is especially useful for this scenario since you can determine whether or not the self-referential canonical tags generated enough clicks for the paginated pages to make up for the loss in clicks to the first page. (Note that fix can also increase clicks to the product pages found within the paginated categories as well.)
Step 3: Studying the Results
You may be thinking “How would I know when Google has picked up on my changes?”
You can easily answer this question by navigating to the “Pages” tab on the RankSense app. The Pages tab shows you every page that has ever been crawled by Google on your site (since the software was installed), as well as the date of the last time it has been crawled. It even shows the tags associated with URL, making it easier to identify whether the pages with the self-referential canonical tags have been crawled yet.
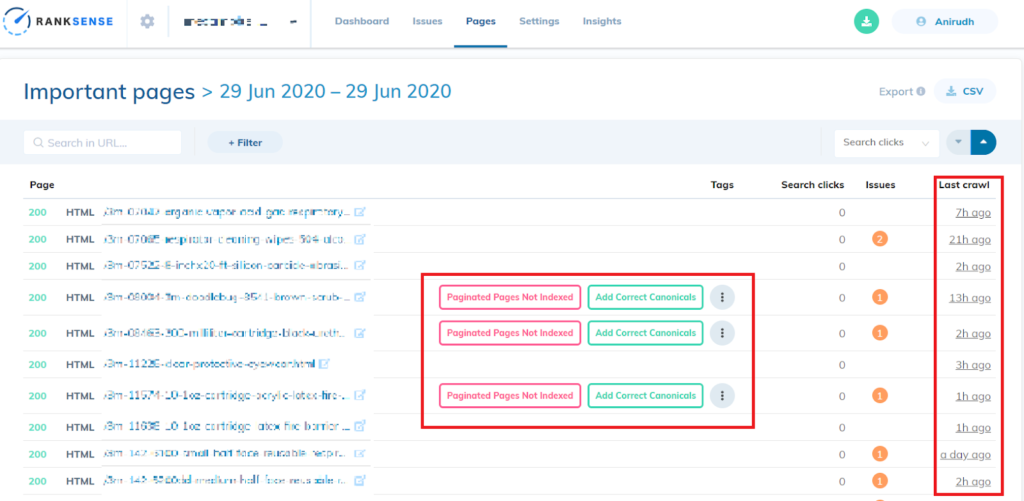
(The image has been blurred for privacy reasons)
You can even find this information on the “Dashboard” when you scroll down to “Crawler statistics”. Here you can apply many more filters in order to find the crawl statistics of the exact types of pages that you are looking for.
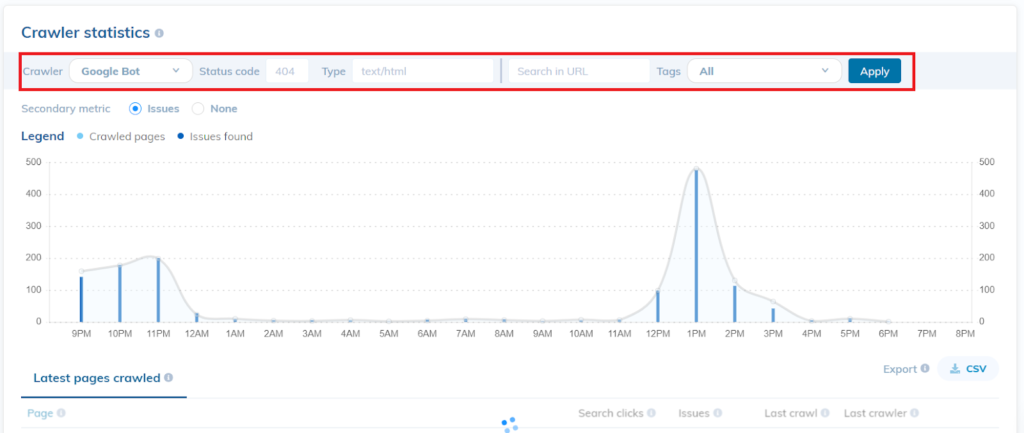
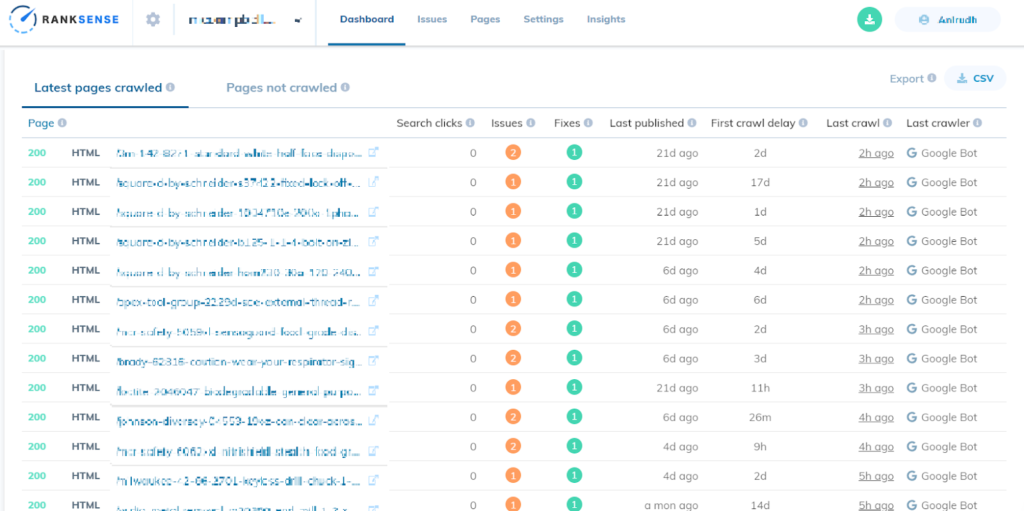
Once you notice that some of the paginated pages have been crawled, survey the performance of those pages using the Insights tab and determine which use of canonical tags is more appropriate for your website.
As mentioned previously, in theory self-referential canonicals should perform better. However, certain websites benefit from canonicals pointing to the first page in a paginated set. Therefore, the RankSense app is crucial in order to formulate the best changes for your website.
(Note: The longer you track these statistics, the more accurate the data will be).
As you can see, tagging and tracking changes is very simple yet extremely effective. When implementing something such as self-referential canonicals, which could provide a major benefit or a setback, it is very important to track their performance.
We learned that…
- Self-referential canonical tags are better in theory since they allow the pages in a paginated set to be indexed, along with their keywords and internal links.
- We can use the Screaming Frog SEO Spider crawler to drastically cut down the time needed to implement our changes.
- Making SEO changes is extremely simple using the RankSense app as you can simply list the changes in a spreadsheet
- We can track the performance of our SEO changes using the Insights tab of the RankSense app, allowing us to verify the effectiveness of our modifications

 Table of Contents:
 Step 2: Crawling the Website
 Step 3: Finding the Site’s Canonical Tags


